Purpose of the Post
현대 IT 환경에서 데이터베이스의 보안은 그 중요성이 점점 커지고 있습니다. 특히, 클라우드 환경에서 애플리케이션과 데이터베이스 간의 안전한 인증 체계를 구축하는 일은 필수적입니다. Azure에서는 이를 위해 Managed Identity와 Access Token 인증 방식을 제공하고 있으며, 이는 비밀번호 없이 안전하게 리소스에 접근할 수 있도록 도와줍니다.
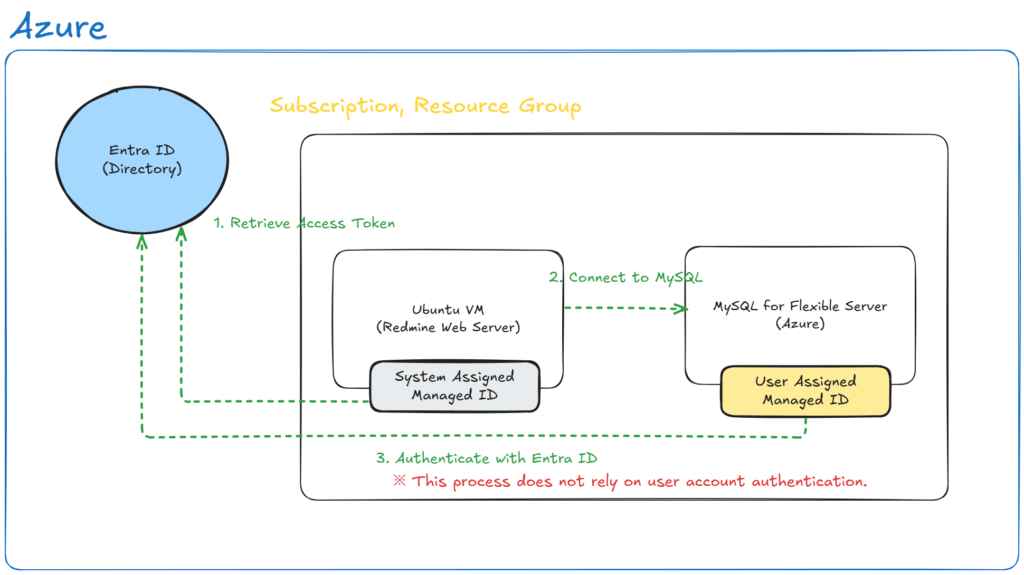
이번 포스팅에서는 Ubuntu 기반의 VM에서 System Assigned Managed Identity를 활용해 Azure MySQL Flexible Server와 안전하게 연결하는 방법을 다룹니다. 실습을 통해 인증 과정을 단계별로 구현하며, 이를 실제 환경에서 활용할 수 있는 팁까지 함께 알아보겠습니다.
Redmine 설치를 위해 사용된 테스트 환경은 다음과 같습니다:
- 운영 체제: Ubuntu 20.04 LTS (Virtual Machine)
- Redmine 버전: 5.1-stable
- Ruby 버전: 3.2.4
- Apache 버전: 2.4
- 데이터베이스: Azure MySQL Flexible Server
- Azure CLI 버전: 최신 버전 (설치 과정에서 업데이트)
이 환경은 VM을 활용한 Azure MySQL Flexible Server를 조합해 관리 ID를 이용한 시스템 인증 시나리오를 검증하기 위해 구성되었습니다.
Reference: https://blog.redmine.jp/articles/5_1/install/ubuntu24/
Ubuntu 환경 구축
Virtual Machine (Ubuntu) 준비
Ubuntu 서버 구축 가이드에 대한 자세한 설정은 솔직히 저도 잘 몰라서, 본 포스트에서는 기본 설치 과정에만 집중했습니다. 네트워크 설정이 꼬이거나 GUI 환경이 필요하시다면, Ubuntu 공식 문서나 더 똑똑한 분들의 블로그를 참고해주세요.
“아는 척은 죄가 아닙니다만, 모르면 넘겨야죠!”
Azure CLI 설치
Ubuntu 에서 Azure CLI 를 사용하기 위한 관련 패키지 설치 및 설정을 진행합니다.
# Update the list of available packages and their versions
sudo apt update

# Install required packages for adding a new repository securely
sudo apt-get install -y ca-certificates curl apt-transport-https lsb-release gnupg

# Download Microsoft's GPG key, convert it to the required format, and save it securely
curl -sL https://packages.microsoft.com/keys/microsoft.asc | gpg --dearmor | sudo tee /usr/share/keyrings/microsoft.gpg > /dev/null

# Add the Microsoft Azure CLI repository to the list of sources
echo "deb [arch=amd64 signed-by=/usr/share/keyrings/microsoft.gpg] https://packages.microsoft.com/repos/azure-cli/ $(lsb_release -cs) main" | sudo tee /etc/apt/sources.list.d/azure-cli.list

# Update the list of available packages again to include the newly added repository
sudo apt update

# Install the Azure CLI package
sudo apt-get install -y azure-cli
- 사용 가능한 패키지 목록과 버전을 업데이트
- 시스템에 설치된 패키지 목록과 저장소의 최신 정보를 업데이트합니다.
- 새로운 저장소를 안전하게 추가하기 위해 필요한 패키지 설치
ca-certificates,curl,apt-transport-https,lsb-release,gnupg패키지를 설치하여 HTTPS를 통한 안전한 저장소 추가를 지원합니다.
- Microsoft의 GPG 키를 다운로드하여 변환 후 안전하게 저장
- Microsoft의 GPG 키를 다운로드하고,
dearmor를 사용하여 변환한 뒤/usr/share/keyrings/microsoft.gpg경로에 저장합니다.
- Microsoft의 GPG 키를 다운로드하고,
- Microsoft Azure CLI 저장소를 소스 목록에 추가
- Azure CLI 설치를 위해 Microsoft의 Azure CLI 저장소를
/etc/apt/sources.list.d/azure-cli.list파일에 추가합니다.
- Azure CLI 설치를 위해 Microsoft의 Azure CLI 저장소를
- 새로 추가된 저장소를 포함하여 사용 가능한 패키지 목록 다시 업데이트
- Microsoft Azure CLI 저장소의 패키지 목록을 다운로드하여 시스템에 반영합니다.
- Azure CLI 패키지 설치
- Azure CLI를 시스템에 설치합니다. 이는 Microsoft Azure를 명령줄에서 관리할 수 있는 도구입니다.
Redmine 필수 패키지 설치
Redmine 공식 가이드를 참고해 필요한 패키지를 설치합니다.
# Install essential build tools and libraries needed for compiling software
sudo apt install -y build-essential zlib1g-dev libssl-dev libreadline-dev libyaml-dev libcurl4-openssl-dev libffi-dev

# Install PostgreSQL, development libraries, Apache server, and related tools
sudo apt install -y postgresql libpq-dev apache2 apache2-dev subversion git

# Download the Ruby source archive
curl -O https://cache.ruby-lang.org/pub/ruby/3.2/ruby-3.2.4.tar.gz

# Extract the downloaded Ruby archive
tar xvf ruby-3.2.4.tar.gz

# Navigate into the extracted Ruby source directory
cd ruby-3.2.4

# Configure the Ruby build without documentation to reduce installation size
./configure --disable-install-doc

# Compile the Ruby source code
make

# Install the compiled Ruby binaries
sudo make install

# Verify the installed Ruby version
ruby -v
- 소프트웨어를 컴파일하는 데 필요한 필수 빌드 도구와 라이브러리 설치
build-essential,zlib1g-dev,libssl-dev,libreadline-dev,libyaml-dev,libcurl4-openssl-dev,libffi-dev패키지를 설치합니다. 이들은 소스 코드를 컴파일하고 빌드하는 데 필수적인 도구와 라이브러리입니다.
- PostgreSQL, 개발 라이브러리, Apache 서버 및 관련 도구 설치
postgresql,libpq-dev(PostgreSQL 개발 라이브러리),apache2(Apache 웹 서버),apache2-dev(Apache 모듈 개발 도구),subversion(SVN),git등을 설치합니다.
- Ruby 소스 코드 아카이브 다운로드
- Ruby 3.2.4 소스 코드를 공식 Ruby 저장소에서 다운로드합니다.
- 다운로드한 Ruby 아카이브 압축 해제
- 다운로드된
ruby-3.2.4.tar.gz파일의 압축을 해제하여 Ruby 소스 디렉터리를 만듭니다.
- 다운로드된
- 압축 해제된 Ruby 소스 디렉터리로 이동
- 압축 해제된
ruby-3.2.4디렉터리로 이동합니다.
- 압축 해제된
- Ruby 빌드 설정 (설치 크기를 줄이기 위해 문서 비활성화)
- Ruby 빌드를 설정하면서 설치 크기를 줄이기 위해 문서를 비활성화합니다.
- Ruby 소스 코드 컴파일
- 소스 코드를 컴파일하여 실행 가능한 파일을 생성합니다.
- 컴파일된 Ruby 바이너리 설치
- 컴파일된 Ruby를 시스템에 설치하여 사용할 수 있도록 설정합니다.
- 설치된 Ruby 버전 확인
- 설치된 Ruby의 버전을 확인하여 정상적으로 설치되었는지 확인합니다.
Redmine 설치
# Create a directory for Redmine data
sudo mkdir /var/lib/redmine

# Change the ownership of the Redmine directory to the www-data user
sudo chown www-data /var/lib/redmine

# Install Subversion (SVN) version control system
sudo apt-get install -y subversion

# Checkout the stable branch of Redmine source code as the www-data user
sudo -u www-data svn co https://svn.redmine.org/redmine/branches/5.1-stable /var/lib/redmine- Redmine 데이터를 위한 디렉터리를 생성
- Redmine 데이터를 저장하기 위해
/var/lib/redmine경로에 디렉터리를 생성합니다.
- Redmine 데이터를 저장하기 위해
- Redmine 디렉터리의 소유권을 www-data 사용자로 변경
- 웹 서버 사용자(www-data)가 Redmine 디렉터리에 액세스할 수 있도록 소유권을 변경합니다.
- Subversion (SVN) 버전 관리 시스템 설치
- Redmine 소스 코드를 다운로드하기 위해 Subversion을 설치합니다.
- www-data 사용자로 Redmine 소스 코드 안정 버전 체크아웃
- www-data 사용자 권한으로 Redmine 5.1 안정 브랜치 소스 코드를 지정된 디렉터리에 다운로드합니다.
Gem 패키지 설치 및 초기 설정
# Navigate to the Redmine directory
cd /var/lib/redmine

# Configure the bundle to exclude development and test environments
sudo bundle config set --local without 'development test'

# Install all required Ruby gems for the application
sudo bundle install

# Generate a secret token for Redmine
sudo -u www-data bin/rake generate_secret_token

# Run database migrations in the production environment
sudo -u www-data RAILS_ENV=production bin/rake db:migrate
- Redmine 디렉터리로 이동
/var/lib/redmine디렉터리로 이동합니다.
- 번들 설정에서 개발 및 테스트 환경 제외
- 번들 설정을 로컬로 변경하여
development및test환경에 필요한 패키지를 제외합니다.
- 번들 설정을 로컬로 변경하여
- 애플리케이션에 필요한 Ruby 젬 설치
- Redmine 실행에 필요한 모든 Ruby 젬을 설치합니다.
- Redmine의 비밀 토큰 생성
- Redmine 애플리케이션에서 사용하는 고유한 비밀 토큰을 생성합니다.
- 프로덕션 환경에서 데이터베이스 마이그레이션 실행
RAILS_ENV=production설정으로 데이터베이스 구조를 업데이트합니다.
Apache, Passenger 설치 및 설정
# Install the Passenger gem without documentation
sudo gem install passenger -N

# Automatically install the Passenger Apache2 module with Ruby support
sudo passenger-install-apache2-module --auto --languages ruby

# Display the configuration snippet to integrate Passenger with Apache2
passenger-install-apache2-module --snippet

# Edit the Apache2 configuration file for Redmine
sudo vi /etc/apache2/conf-available/redmine.conf

# Enable the Redmine Apache2 configuration
sudo a2enconf redmine

# Reload the Apache2 service to apply changes
sudo systemctl reload apache2- Passenger Gem 설치
passenger는 Ruby 애플리케이션을 위한 웹 애플리케이션 서버로, 이를 설치합니다.-N옵션은 문서 생성을 생략합니다.
- Apache2용 Passenger 모듈 설치 및 Ruby 언어 지원 설정
- Passenger를 Apache2 웹 서버 모듈로 설치하고, Ruby 애플리케이션을 지원하도록 자동으로 설정합니다.
- Apache 설정에 필요한 Passenger 모듈 코드 스니펫 출력
- Apache2 설정에 추가해야 할 Passenger 관련 스니펫 코드를 출력합니다.
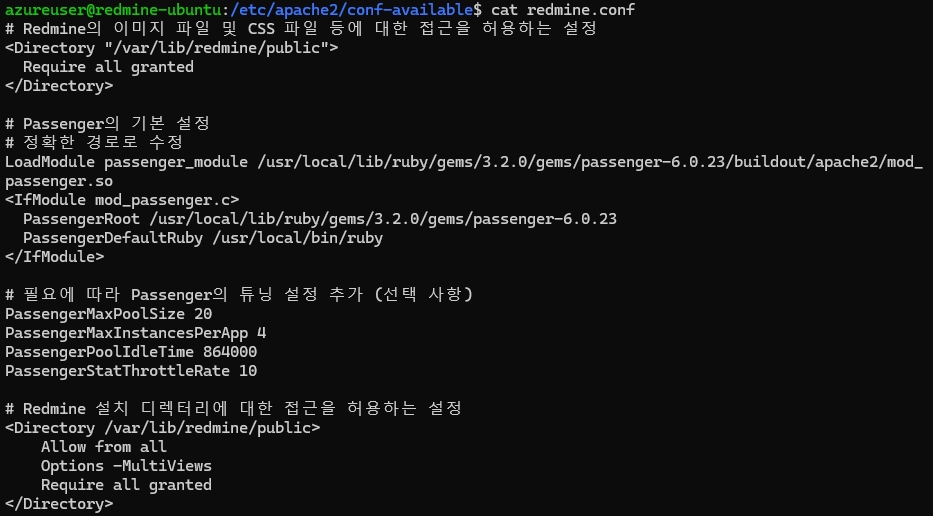
- Apache 설정 파일 생성 및 수정
/etc/apache2/conf-available/redmine.conf파일을 생성하고 Redmine 서버를 설정합니다.
- Apache2에서 Redmine 설정 활성화
a2enconf명령을 사용하여 Redmine 설정을 Apache2에 활성화합니다.
- Apache2 서버 재시작
- Apache 설정 변경 사항을 반영하기 위해 Apache2 서버를 다시 로드합니다.
참고# redmine.conf 구문 에러
(원인: 최신 버전인 passenger-6.0.23 이 설치되어 있었기 때문에 redmine.conf 경로가 잘못되었다.)
apache2ctl configtest
sudo vi redmine.conf
sudo systemctl reload apache2- Apache2 설정 테스트
configtest명령은 Apache 설정 파일에 문법 오류가 없는지 확인합니다.- 출력 결과가
Syntax OK라면 설정에 문제가 없음을 의미합니다.

Apache 를 Redmine 전용으로 설정
기본적으로 Apache의 기본 경로는 /var/www/html로 설정되어 있습니다. 이를 Redmine의 public 디렉토리로 변경하여 Apache를 Redmine 전용 웹 서버로 구성합니다.
# Move to the Apache2 sites-enabled directory
cd /etc/apache2/sites-enabled

# Create a backup of the current default configuration file
sudo cp -p 000-default.conf 000-default.conf.bak

# Edit the default configuration file
sudo vi 000-default.conf

# Test the Apache2 configuration for syntax errors
apache2ctl configtest

# Reload the Apache2 service to apply the changes
sudo systemctl reload apache2- Apache2 sites-enabled 디렉토리로 이동
sites-enabled디렉토리에는 Apache2에서 활성화된 가상 호스트 설정 파일이 위치합니다.
- 기본 설정 파일의 백업 생성
cp -p옵션은 원본 파일의 소유권, 권한, 타임스탬프를 유지하면서 백업 파일을 생성합니다.000-default.conf.bak파일이 기존 설정의 안전한 복사본으로 저장됩니다.
- 기본 설정 파일 수정
vi편집기를 사용하여000-default.conf파일을 엽니다.
- Apache2 설정 파일의 문법 오류를 확인
- 변경된 설정을 적용하기 위해 Apache2 서비스를 리로드
참고# 000-default.conf 설정 예시
<VirtualHost *:80>
    ServerAdmin webmaster@localhost
    DocumentRoot /var/www/html
    ErrorLog ${APACHE_LOG_DIR}/error.log
    CustomLog ${APACHE_LOG_DIR}/access.log combined

    # Redmine Path
    Alias /redmine /path/to/redmine/public
    <Directory /path/to/redmine/public>
        Require all granted
        Options -MultiViews
    </Directory>
</VirtualHost>
MySQL 클라이언트 설치
# Install the MySQL client core version 8.0
# Includes essential MySQL client utilities for interacting with a MySQL server
sudo apt install mysql-client-core-8.0

# Install the MySQL client development library
# Provides headers and libraries needed for compiling and linking MySQL-based applications
sudo apt-get install -y libmysqlclient-dev

# Change to the Redmine directory
cd /var/lib/redmine

# Configure the Bundler to exclude development and test groups
# This ensures only production dependencies are installed
sudo bundle config set --local without 'development test'

# Install the required gems for Redmine
sudo bundle install- MySQL 클라이언트 코어 패키지를 설치합니다.
- 이 패키지는 MySQL 서버와 통신할 수 있는 기본 클라이언트 프로그램 (
mysql명령 등)을 포함합니다.
- 이 패키지는 MySQL 서버와 통신할 수 있는 기본 클라이언트 프로그램 (
- MySQL 클라이언트 개발 라이브러리 및 헤더 파일을 설치합니다.
- MySQL API를 사용하는 애플리케이션을 개발하거나 컴파일할 때 필요한 패키지입니다.
- Bundler를 설정하여 개발 및 테스트 종속성 설치 제외
- 프로덕션 환경에서 필요한 패키지만 설치하도록 구성하여 불필요한 패키지 설치를 줄이고 배포 중 발생할 수 있는 충돌을 방지합니다.
- 필요한 Ruby gem 설치
- Gemfile에 지정된 라이브러리를 다운로드 및 설치하여 애플리케이션이 원활히 실행되는 데 필요한 모든 종속성을 충족합니다.
Azure 환경 구축
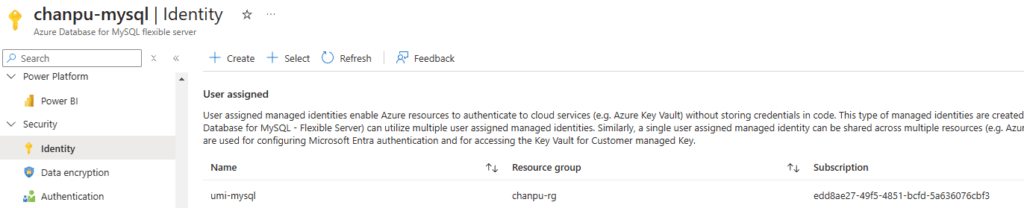
MySQL User Assigned Managed ID 생성
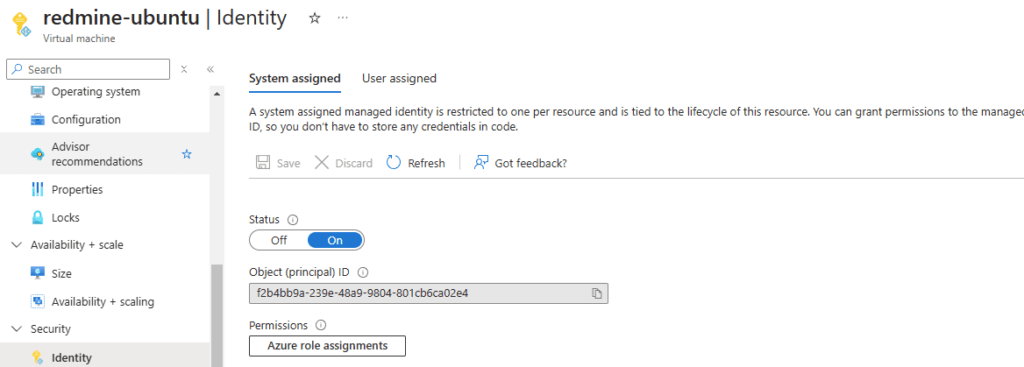
Ubuntu VM System Managed ID 유효화
보안 그룹 생성 및 멤버 추가

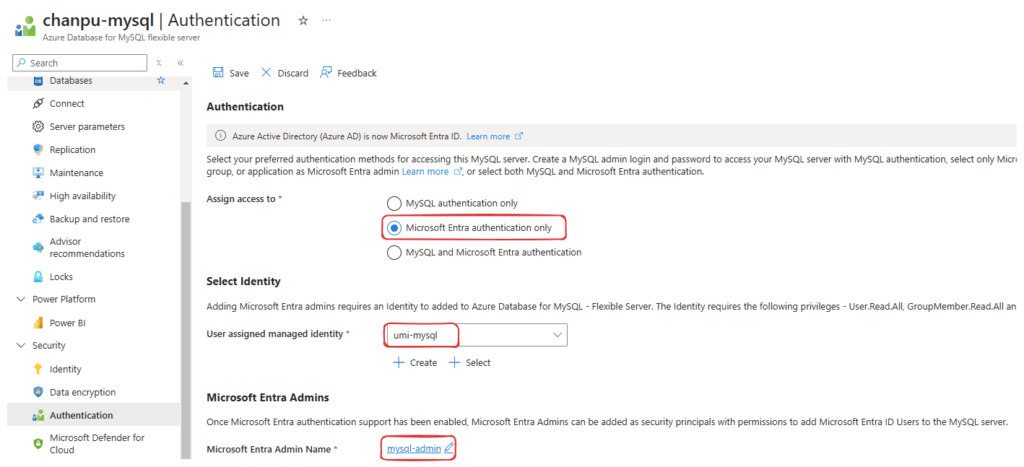
MySQL 인증 방식 및 관리자 설정
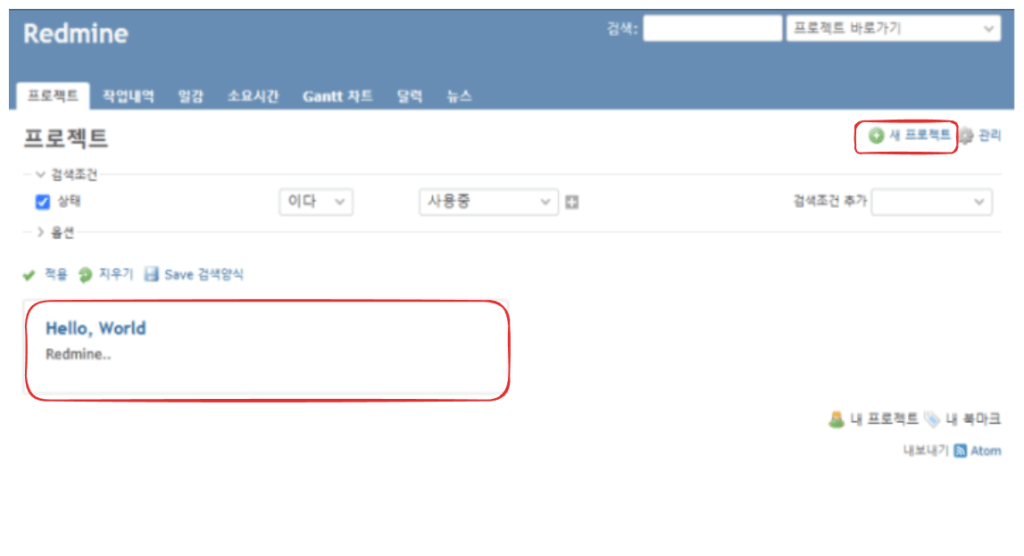
Microsoft Entra Admins 설정을 저장하면 자동적으로 MySQL DB에 유저 (Entra ID Authentication= aad_auth) 가 추가됩니다.
참고# 관리자로 접속하는 경우
Microsoft Entra Admins 에 설정한 그룹에 유저 계정을 추가한 후 아래의 명령어로 MySQL Server 에 접속이 가능합니다.
# Login to Azure CLI
az login

# Retrieve the access token for the Azure MySQL server
ACCESS_TOKEN=$(az account get-access-token \
  --resource-type oss-rdbms \
  --query accessToken -o tsv)

# Connect to the Azure MySQL server using the access token
mysql -u "mysql-admin" \
  -h chanpu-mysql.mysql.database.azure.com \
  --enable-cleartext-plugin \
  --password="$ACCESS_TOKEN"
MySQL 에서 Microsoft Entra Admins 가 정상적으로 추가되었는지 확인하려면 아래의 명령어를 실행합니다.
SELECT user, host, plugin FROM mysql.user;Ubuntu 환경 구축 #2
SSL 인증서 설치 및 설정
# Download the SSL certificate and save it to the /etc/ssl/certs/ directory
sudo wget https://www.digicert.com/CACerts/BaltimoreCyberTrustRoot.crt.pem -O /etc/ssl/certs/BaltimoreCyberTrustRoot.crt.pem

# Verify the file permissions of the downloaded SSL certificate
ls -l /etc/ssl/certs/BaltimoreCyberTrustRoot.crt.pem # Expected: -rw-r--r-- 1 root root

# Verify the directory permissions of the /etc/ssl/certs/ directory
ls -ld /etc/ssl/certs/ # Expected: drwxr-xr-x 2 root root- SSL 인증서 다운로드 및 저장
- SSL 인증서를
wget명령어로 다운로드합니다. -O옵션을 사용하여/etc/ssl/certs/디렉토리에 저장합니다.
- SSL 인증서를
- 인증서 접근 권한 확인
- 정상적인 권한 설정:
-rw-r--r-- 1 root root
- 정상적인 권한 설정:
- 디렉토리 접근 권한 확인
- 정상적인 권한 설정:
drwxr-xr-x 2 root root
- 정상적인 권한 설정:
Redmine 의 database.yml 수정
Redmine 설치 후 데이터베이스 설정이 필요합니다. 기본적으로 MySQL이나 PostgreSQL을 사용할 수 있으며, 이를 설정하려면 database.yml 파일을 편집해야 합니다. 설정이 완료된 후, rake db:migrate RAILS_ENV=production 명령어를 사용하여 데이터베이스를 초기화하세요.
# Navigate to the Redmine configuration directory
cd /var/lib/redmine/config

# List files related to database configuration
ls -l | grep -i database.yml

# Edit the database configuration file
sudo vi database.yml
참고# database.yml 예시
production:
  adapter: mysql2
  database: redmine
  host: chanpu-mysql.mysql.database.azure.com
  username: mysql-admin
  password: <%= ENV['ACCESS_TOKEN'] %> # Access token retrieved from environment variable
  encoding: utf8
  port: 3306
  ssl_mode: required
  sslca: /etc/ssl/certs/BaltimoreCyberTrustRoot.crt.pem # SSL certificate for secure connection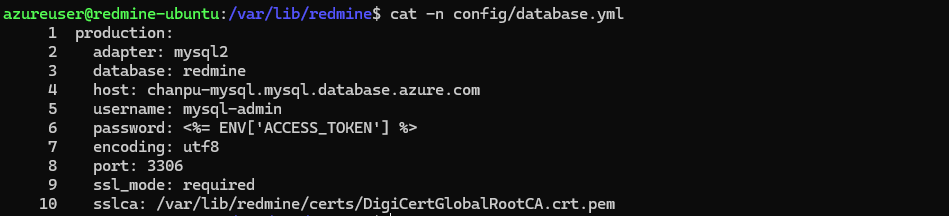
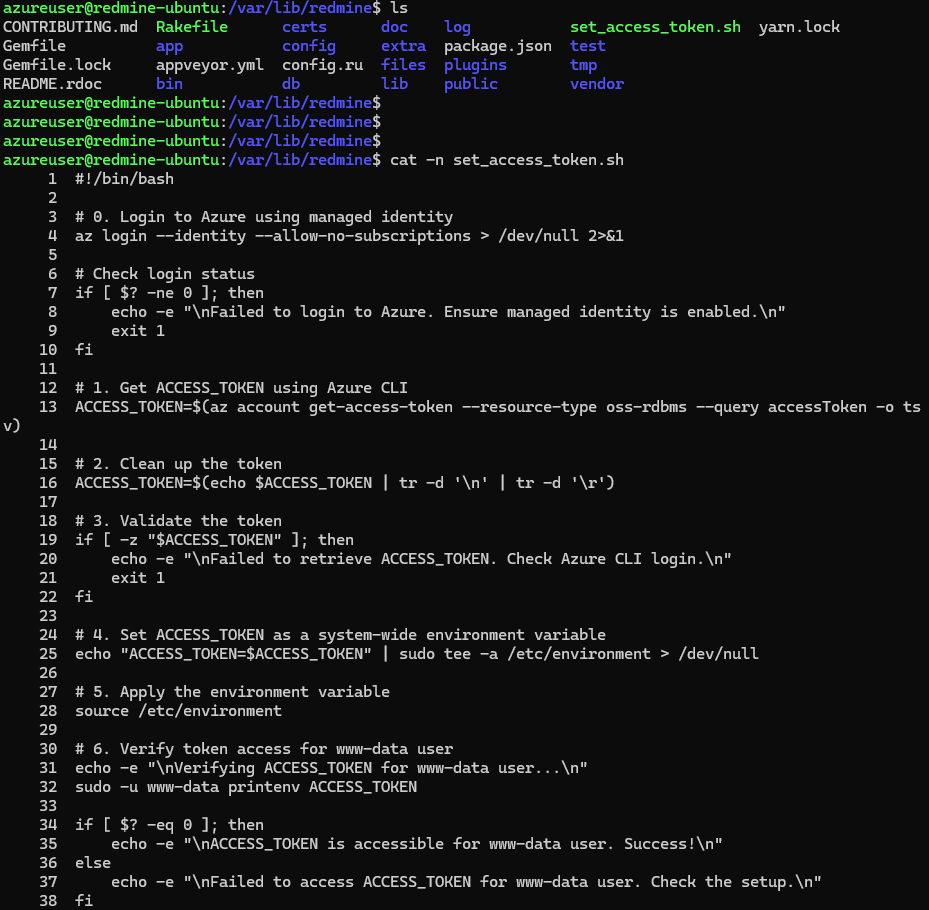
Azure Access Token 취득 스크립트 작성
#!/bin/bash

# 0. Login to Azure using managed identity
echo "Logging in to Azure using managed identity..."
az login --identity --allow-no-subscriptions > /dev/null 2>&1

# Check login status
if [ $? -ne 0 ]; then
    echo -e "\n[Error] Failed to login to Azure. Ensure managed identity is enabled.\n"
    exit 1
fi

# 1. Retrieve ACCESS_TOKEN using Azure CLI
echo "Retrieving ACCESS_TOKEN..."
ACCESS_TOKEN=$(az account get-access-token --resource-type oss-rdbms --query accessToken -o tsv | tr -d '\n\r')

# 2. Validate the token
if [ -z "$ACCESS_TOKEN" ]; then
    echo -e "\n[Error] Failed to retrieve ACCESS_TOKEN. Check Azure CLI login.\n"
    exit 1
fi
echo "ACCESS_TOKEN retrieved successfully."

# 3. Set ACCESS_TOKEN as a system-wide environment variable
echo "Setting ACCESS_TOKEN as a system-wide environment variable..."
echo "ACCESS_TOKEN=$ACCESS_TOKEN" | sudo tee -a /etc/environment > /dev/null

# 4. Apply the environment variable
source /etc/environment

# 5. Verify token access for www-data user
echo -e "\nVerifying ACCESS_TOKEN for www-data user..."
sudo -u www-data printenv ACCESS_TOKEN

if [ $? -eq 0 ]; then
    echo -e "\n[Success] ACCESS_TOKEN is accessible for www-data user.\n"
else
    echo -e "\n[Error] Failed to access ACCESS_TOKEN for www-data user. Check the setup.\n"
fi
- 스크립트를 작성한 후
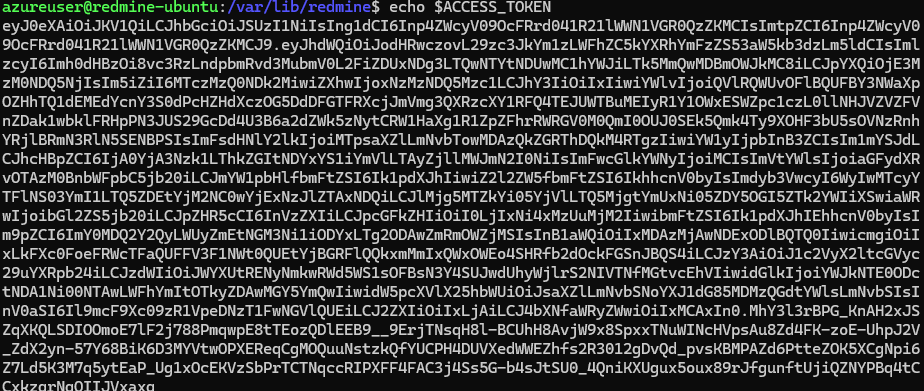
/var/lib/redmine/set_access_token.sh로 저장합니다. chmod +x /var/lib/redmine/set_access_token.sh명령을 통해 실행 권한을 부여합니다.- 스크립트를 실행하여 Azure Access Token을 환경 변수로 설정하고 접근을 확인합니다.
echo $ACCESS_TOKEN명령을 통해 토큰 취득 결과를 확인합니다.
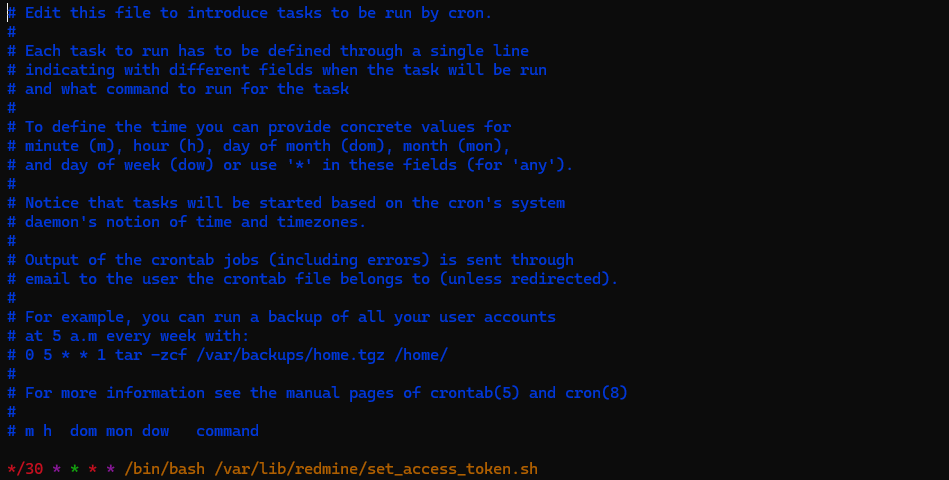
Cron을 이용한 토큰 주기적 취득 설정
*/30 * * * * /bin/bash /var/lib/redmine/set_access_token.sh- Crontab 편집
sudo crontab -e명령을 실행하여 루트 사용자용 Crontab 파일을 엽니다.
- 30분 간격으로 스크립트 실행
- 아래의 내용을 Crontab 파일에 추가하여 30분마다 Access Token을 갱신합니다.
Redmine DB 마이그레이션
# Run database migrations for Redmine in production mode
# Execute the command as the www-data user
# Enable clear text password plugin for MySQL authentication (use in secure environments only)
sudo -u www-data RAILS_ENV=production bin/rake db:migrate LIBMYSQL_ENABLE_CLEARTEXT_PLUGIN=1
sudo -u www-data- www-data 사용자 권한으로 명령을 실행합니다.
- 일반적으로 웹 서버 및 관련 작업(예: Redmine)이 www-data 사용자의 권한으로 실행됩니다.
RAILS_ENV=production- Rails 환경 변수를 production으로 설정합니다.
- 이는 애플리케이션이 프로덕션 환경에서 동작하도록 설정하며, 개발 및 테스트 환경과 구분됩니다.
bin/rake db:migrate- Rake 명령을 실행하여 데이터베이스 마이그레이션을 수행합니다.
- Redmine에서 정의된 데이터베이스 스키마 변경 사항을 반영합니다.
LIBMYSQL_ENABLE_CLEARTEXT_PLUGIN=1- MySQL에서 클리어 텍스트 패스워드 인증 플러그인을 활성화합니다.
- MySQL 클라이언트와 서버 간에 암호화되지 않은 비밀번호를 허용하도록 설정합니다.
- 주의: 이 설정은 보안상의 위험이 있으므로 반드시 안전한 네트워크 환경에서만 사용해야 합니다.

MySQL DB 연동 검증
- 직접 접속 테스트:
mysql -u명령어로 MySQL에 직접 접속. - 애플리케이션 설정 확인:
database.yml및 Rails 콘솔에서 연결 상태 확인. - DB 마이그레이션 상태:
rake db:migrate:status로 확인. - 로그 확인: MySQL 로그 및 애플리케이션 로그에서 문제 발생 여부 확인.
- 애플리케이션 테스트: Redmine에서 데이터 조회 및 쓰기 작업 확인.